Have you created a VPN HUB and the connection to your remote devices is not working? In this article we explain what you can check and what actions you can take to try to solve it.
Initial checks
First of all check the following:
- Is the Teltonika device ONLINE in RMS? Remember that for the VPN to work, it is firstly necessary for the Teltonika team to have access to the Internet and, secondly, to have a valid RMS credit to be active on the platform.
- That you have created the route to the device with which you want to connect. Remember that apart from the VPN clients of the HUB that are the Teltonika devices and your computer (such as RMS_user or custom_user) you must create a route to each of the devices behind the router to which you want to connect.
- Remember to configure the gateway of all the devices you want to access remotely pointing to the LAN address of the Teltonika router (192.168.1.1 by default)
- Finally, remember that after creating a route it is necessary to do a VPN Restart so that the server ‘pushes’ this new route to all VPN clients.

Connection of VPN clients
Verify that the devices are indeed connected to the VPN as clients. You have the information at the top right in the window with the details of the HUB.

If a connected device does not appear, you can reload the configuration on the devices in the CLIENTS tab (by clicking on the yellow icon). In any case, remember that the connection of the clients can take up to 1 minute or more.

If all clients are properly configured and activated, they will appear as connected to the HUB.

Manual or automatic routes
The RMS platform allows you to scan the devices connected to both the LAN and WAN interfaces of the Teltonika devices and select them by automatically creating a route only to the IP address of this device.
To activate automatic scanning we must enable forwarding on the LAN and/or WAN interfaces (see the following figure). If we enable the connection to WAN devices we can create a VPN tunnel even to devices present in the installation on the same network as our router (for example, the installation’s fiber router). We must use this option with caution for security reasons.

Automatic scanning has two advantages:
- allows you to be sure that the router has IP connectivity with the device you are going to add because it has ‘discovered’ it
- creates a mask 255.255.255.255 only for the IP of the device, being able to use other addresses of the same /24 range for other devices connected to other VPN clients in the same HUB
If instead you want to add several devices in a single rule and you are sure not to reuse the same range of addresses for another VPN client in the same HUB you can use the manual method and choose a wider mask (for example /24 or 255.255. 25..0).
Multiple LANs on our router
Teltonika routers allow you to define different ranges of addresses on the LAN interface by creating new interfaces (for example, LAN2)

The auto-scanning mechanism allows devices connected on all LAN interfaces to be discovered so that they can be added as routes and accessed through the VPN.
However, these additional LANs need to be manually added to the main LAN firewall zone on the router in order for the router to allow traffic between the VPN tunnel and those interfaces. For this we will edit the additional LAN interface and select the FIREWALL SETTINGS tab on the left. Next we will add the lan and LAN2 interfaces to the same firewall zone so that all the rules that apply to the lan interface also apply to the additional LAN2 interface.

How to identify the active tunnels on my router and my computer?
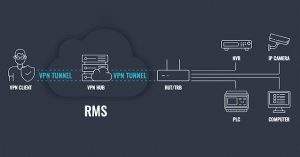
RMS allows you to create multiple VPN connections that are called HUBS. We can even assign several HUBS to the same router, connecting it to multiple VPN networks simultaneously. Sometimes we may not know exactly which tunnel the router is using or which ovpn file we should load on our computer to connect to the VPN.
RMS identifies each VPN hub with a unique tunnel identifier. Below we explain how to obtain this identifier both in the routers and in the downloaded ovpn files.
If we enter the router configuration in the OpenVPN section we will see the client downloaded from our HUB. We can see that it is connected but we cannot identify the tunnel to which it corresponds. The tunnel name corresponds to the generic description of our hub (DEMO2) but we could delete it and create another hub with the same name that would have a different tunnel identifier.

To identify the tunnel we will go to the Status – Routes section and in the route table we will be able to see some with the name tunxxxxx (where xxxxx is the tunnel identifier, 06da9b in our example).

In the case of ovpn files to download to our computer and connect to the VPN as a client, we can open said file with any text editor and in the first lines we will find both the tunnel identifier (tund06da9b) and the connection udp port (32853) which must match the one shown in the list of openvpn instances. This way we can make sure to use the correct file for each VPN hub.
client
nobind
dev tund06da9b
remote-cert-tls server
remote 3.69.106.81 32853 udp
remote 3.65.167.143 32853 udp
And finally, DO NOT forget to disable your HUB VPN if you are not going to connect to the VPN. This way you will not spend credits on keep-alive traffic from client routers
 (Ninguna valoración todavía)